
How Can I Build a Simple Raised Garden Bed
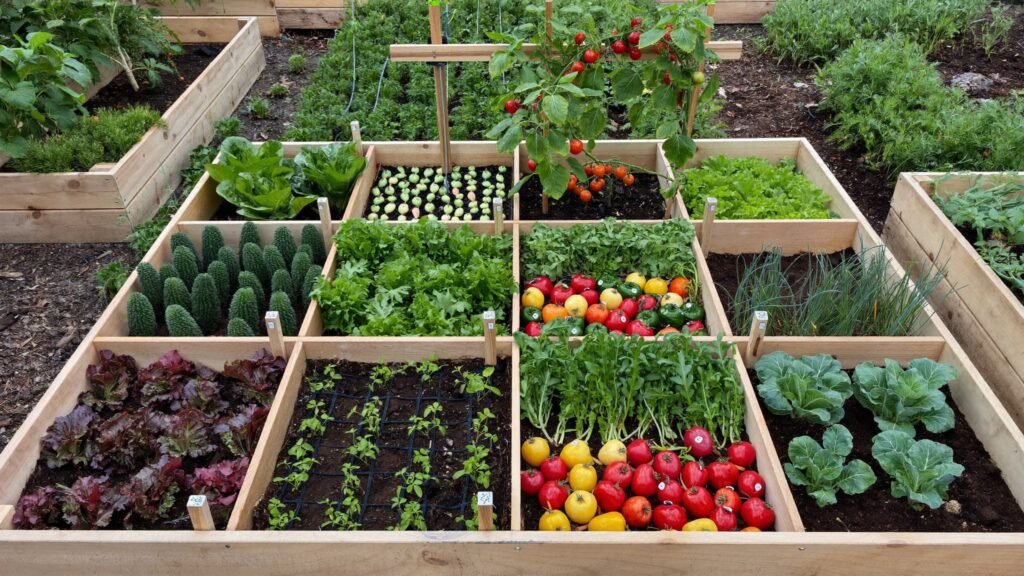
A raised garden bed is the perfect first building project: it’s simple enough for a complete beginner, useful enough to justify the effort, and forgiving enough that small mistakes don’t matter. My first raised bed was slightly crooked, the corners weren’t perfectly square, and it grew the best tomatoes I’ve ever tasted. Nobody cares if the corners are perfect — the plants certainly don’t.
Here’s how to build a simple raised garden bed in a weekend, for about $50–$150 depending on size and materials.
How Can I Build a Simple Raised Garden Bed?
A raised bed is just a bottomless box sitting on the ground, filled with good soil. The box warms up faster in spring, drains better than native soil, keeps pathways out of the growing area (no compacted soil), and saves your back — you can even build it tall enough to garden without bending. The classic size is 4×8 feet — wide enough to grow plenty, narrow enough to reach the center from either side (never make a bed wider than 4 feet unless you can access it from all sides).
Materials and Tools
For one 4×8-foot bed, 10–12 inches deep:
- Lumber: three 2x10x8 boards (two cut in half for the 4-foot ends, one left whole… actually: two 8-foot boards for the long sides, one 8-foot board cut into two 4-foot ends). Cedar or redwood ($40–$80 total) naturally resists rot for 10–15 years — the best choice. Untreated pine or fir ($20–$40) is cheapest but lasts only 3–5 years. Pressure-treated lumber (modern ACQ-treated, $30–$60) is safe for vegetable gardens by current EPA standards and lasts 10+ years — the old arsenic-treated (CCA) lumber is long gone from stores.
- Fasteners: 3-inch exterior deck screws ($8–$12 for a box) — don’t use nails; screws hold against soil pressure.
- Optional: 4×4 corner posts for extra stability on longer beds, landscape fabric for the bottom (weed suppression), hardware cloth if burrowing pests are an issue.
- Tools: drill/driver, saw (circular saw or hand saw — many lumber yards cut boards to length for free), tape measure, level, staple gun (for fabric).
What NOT to use: railroad ties (creosote), old CCA-treated lumber (arsenic), or painted/scrap wood of unknown origin — all can leach chemicals into vegetable soil.
Step 1: Choose the Location
Most vegetables need 6–8 hours of direct sun daily. Watch your yard for a day and note sun patterns — morning sun with afternoon shade works in hot climates; full sun is best in cooler ones. The site should be relatively level (minor slopes are fine — you’ll level the bed), near a water source (you’ll water constantly in summer — distance to the hose matters more than you think), and accessible — you’ll visit daily in growing season, so don’t put it in the far corner you’ll never walk to.
Avoid: low spots that flood, areas under trees (roots compete for water and nutrients, shade reduces sun), and right against the house (termite and moisture concerns with wood beds).
Step 2: Prepare the Ground
Mow the grass short where the bed will sit. You don’t need to remove sod — lay cardboard (plain brown, tape removed) directly over the grass inside the bed footprint. The cardboard smothers the grass, decomposes over the season, and the worms love it. This “lasagna” method saves hours of sod removal.
If burrowing pests (moles, gophers) are a problem in your area, lay 1/2-inch hardware cloth under the bed before the cardboard — it’s the only reliable defense, and it’s nearly impossible to add later.
Step 3: Build the Box
- Cut boards to length: two 8-foot boards (long sides), two 4-foot boards (ends, cut from the third 8-foot board).
- Assemble on level ground: form the rectangle, check that corners are square (measure diagonals — equal diagonals mean square), and drive two 3-inch deck screws per corner through the long side into the end of the short side. Pre-drill to prevent splitting, especially near board ends.
- Position the bed on the prepared site. Check level in both directions — shim with soil or gravel under low corners. An unlevel bed looks sloppy and waters unevenly.
- Optional second layer: for a deeper bed (20–24 inches — great for root vegetables and for gardeners who don’t want to bend), stack a second identical box on top, staggering the corner joints like brickwork, and screw the layers together.
Step 4: Fill With Soil (The Most Important Step)
Don’t fill with garden soil or topsoil alone — it’s too dense for raised beds. The classic mix: 60% high-quality topsoil, 30% compost, 10% aeration material (perlite, vermiculite, or coarse sand). Or buy raised bed mix in bags ($5–$8 per 1.5 cu ft) — convenient but pricey for large beds. A 4x8x1-foot bed needs about 32 cubic feet (roughly 1.2 cubic yards) — buying in bulk from a landscape supplier ($30–$60 per cubic yard delivered) is far cheaper than bags for full-size beds.
Money-saving fill trick: fill the bottom third with logs, branches, and leaves (hugelkultur method) — they decompose slowly, feeding the soil for years, and you buy a third less soil. Avoid black walnut (toxic to plants) and construction debris.
Water the filled bed thoroughly and let it settle for a few days before planting — it’ll drop several inches. Top off as needed.
Step 5: Plant and Maintain
Start with easy winners: tomatoes, peppers, lettuce, herbs, zucchini, and beans all thrive in raised beds. Follow square-foot gardening spacing for maximum yield in minimum space. Mulch the surface with 2–3 inches of straw or wood chips to retain moisture and suppress weeds. Water deeply but less frequently — raised beds drain well, which means they also dry faster than ground soil. A soaker hose ($15–$25) on a timer is the set-and-forget solution.
Each season, top-dress with an inch of compost to replenish nutrients. Test soil pH every couple of years ($15 kit) — most vegetables want 6.0–7.0. Rotate crop families yearly to prevent soil-borne diseases from building up.
Expansions and Upgrades
Once the first bed succeeds, consider: hoop houses (PVC pipe bent over the bed with row cover — extends the season by weeks on both ends, $20–$30), trellises on the north side for vertical growing (cucumbers, beans, peas — doubles your growing area), drip irrigation on a timer (the ultimate convenience upgrade), and cold frames for winter greens. Each addition is cheap and compounds the bed’s productivity.
For the broader low-effort yard picture, our guide to low-maintenance landscaping ideas keeps the rest of the yard as easy as the garden bed. And The Old Farmer’s Almanac has excellent planting calendars by region.
Practical Takeaway
Build a 4×8-foot cedar box with deck screws on a sunny, level, water-accessible spot; smother grass with cardboard (plus hardware cloth if pests are an issue); fill with a topsoil-compost-aeration mix; mulch, water consistently, and start with easy crops. It’s a $50–$150 weekend project that produces fresh food for years — and there’s nothing quite like a tomato you grew twelve steps from your kitchen. Once the bed is thriving, consider our guide to backyard outdoor lighting options so you can enjoy the garden long after sunset.





1 thought on “How Can I Build a Simple Raised Garden Bed”